
Rewrites: May 2016 & September 2018
Moving right along now with my resin kit reviews, I'd like to now focus on a two ship set from Cozmo Heavy Industries called the 1:2500 scale Oberth Support Vessels.
.JPG)
C.H.I.'s eBay Advertisement
This kit gives you enough parts to build two different ships. One of them is the classic styled Oberth that we all know as the USS Grissom. The other ship that you can build is a cargo hauler and Jay, the guy who owns and operates C.H.I., includes a hospital ship module.
Per Memory Alpha and Beta, "The Oberth class was a small Federation starship used primarily by Starfleet and civilian scientists alike, as a scout class and science vessel, from the late-23rd to the late-24th century."
If you would like to read more official stuff on this type of ship, feel free to check out the following links:
Oberth Class Information: Memory Alpha LINK and Memory Beta LINK
USS Grissom (NCC-638) Information: Memory Alpha LINK and Memory Beta LINK
The kit comes with a total of 19 pieces and two stand bases. Jay also supplies some very nice decals that will make your hospital module really stand out. Both ships measure in at 8cm when complete.
I normally would not have invested money in models that are this small. I prefer my models to be around the 6" mark, however, having watched Jay build this kit from scratch over at his FaceBook page, I realized that these models might be a fun little project.


Every once in a while, I'll have a little extra stuff to share with you that sort of fits in with my comparison articles.


As always, I hope you found this article useful and informative. If you have any questions, comments or suggestions, please feel free to comment below.
So for now, "Live long and prosper!!!"
Jay who runs Cozmo Heavy Industries sells all of his kits via eBay. He changes out what ships are for sale every Saturday evening so it is best to check in once a week to see what he has for sale.
Jay also maintains a FaceBook page where he likes to share his work in progress on future kit releases. I really like this approach as I'm a big fan of behind the scenes stuff.
Lastly, Jay does have a website, but it is more of an informational page about the business and he has hinted on FaceBook that he may be closing down that site.
I find Jay to be a very approachable garage kit maker. He has a regular day job and uses the business to not only allow him to make new ships for himself but to also help fund his love for the hobby. If you have ever followed Jay's work, you will know that he hand makes all of his kits from pre-existing parts, and he hand crafts all the other pieces for the ship. This allows him to produce all sorts of unique model kits. He loves to talk about the hobby and has lots of good advice about the hobby if you ever ask him for it. He will usually answer any questions you send to him within a day or two.
C.H.I.'s eBay Seller Profile: CLICK HERE
C.H.I.'s FaceBook Page: CLICK HERE
C.H.I.'s Website: CLICK HERE
When I interviewed Jay about his business, he says that a lot of his kits were designed and made over 20 years ago so he is unsure now just how long it took to make most of them which is why I don't have a lot of behind the scenes information about the kits like in my other reviews.
Jay recently shared on his FaceBook page about his stance on stands. In it he wrote, "Everybody does theirs different. I use .055" piano wire and not everybody has that size drill bit. Plus, that tiny wire would put a hole in the bag and get lost. I have also seen people use clear rod, or use the base as a badge to apply to a larger stand." So there you go. And as I've said in other articles, I have yet to see a resin kit that comes with a rod.
I consider myself an intermediate model maker. I'm pretty good with assembling kits these days and OK on the painting side of things. I ultimately end up with ships that look good enough to me to display in my collection. I've found that there are all sorts of neat ships out there that no one has made a pre-built or pre-painted model of, so, in an effort to expand my ship collection I've turned to building them myself, either by kitbashing or purchasing ready made resin model kits.
There are several smaller garage kit makers out there that produce some very good kits. I've actually developed a good relationship with a couple of them and volunteered some of my time to write up reviews about the kits I've purchased from them. I have already warned them that I intend to be pretty objective, not pull any punches, and these reviews are going to be written from the point of view of an intermediate model builder. If this means that I warn away a first time builder from a particular kit, then they will need to be OK with that approach.
Lastly, due to the nature of resin casting, not every kit is going to be the same. Excess resin and air pockets are a part of the game when you get into this sort of model building. The kit that I got and built may be slightly different than your kit as far as minor quality issues. I will still point out flaws with my kit as those flaws could lead into a lesson of some sort for either you the reader or the kit maker themselves.
Per Memory Alpha and Beta, "The Oberth class was a small Federation starship used primarily by Starfleet and civilian scientists alike, as a scout class and science vessel, from the late-23rd to the late-24th century."
If you would like to read more official stuff on this type of ship, feel free to check out the following links:
Oberth Class Information: Memory Alpha LINK and Memory Beta LINK
USS Grissom (NCC-638) Information: Memory Alpha LINK and Memory Beta LINK
The kit comes with a total of 19 pieces and two stand bases. Jay also supplies some very nice decals that will make your hospital module really stand out. Both ships measure in at 8cm when complete.
I normally would not have invested money in models that are this small. I prefer my models to be around the 6" mark, however, having watched Jay build this kit from scratch over at his FaceBook page, I realized that these models might be a fun little project.
Cargo Hauler/Hospital Ship
Hauler Ship


Cargo Hauling Mode


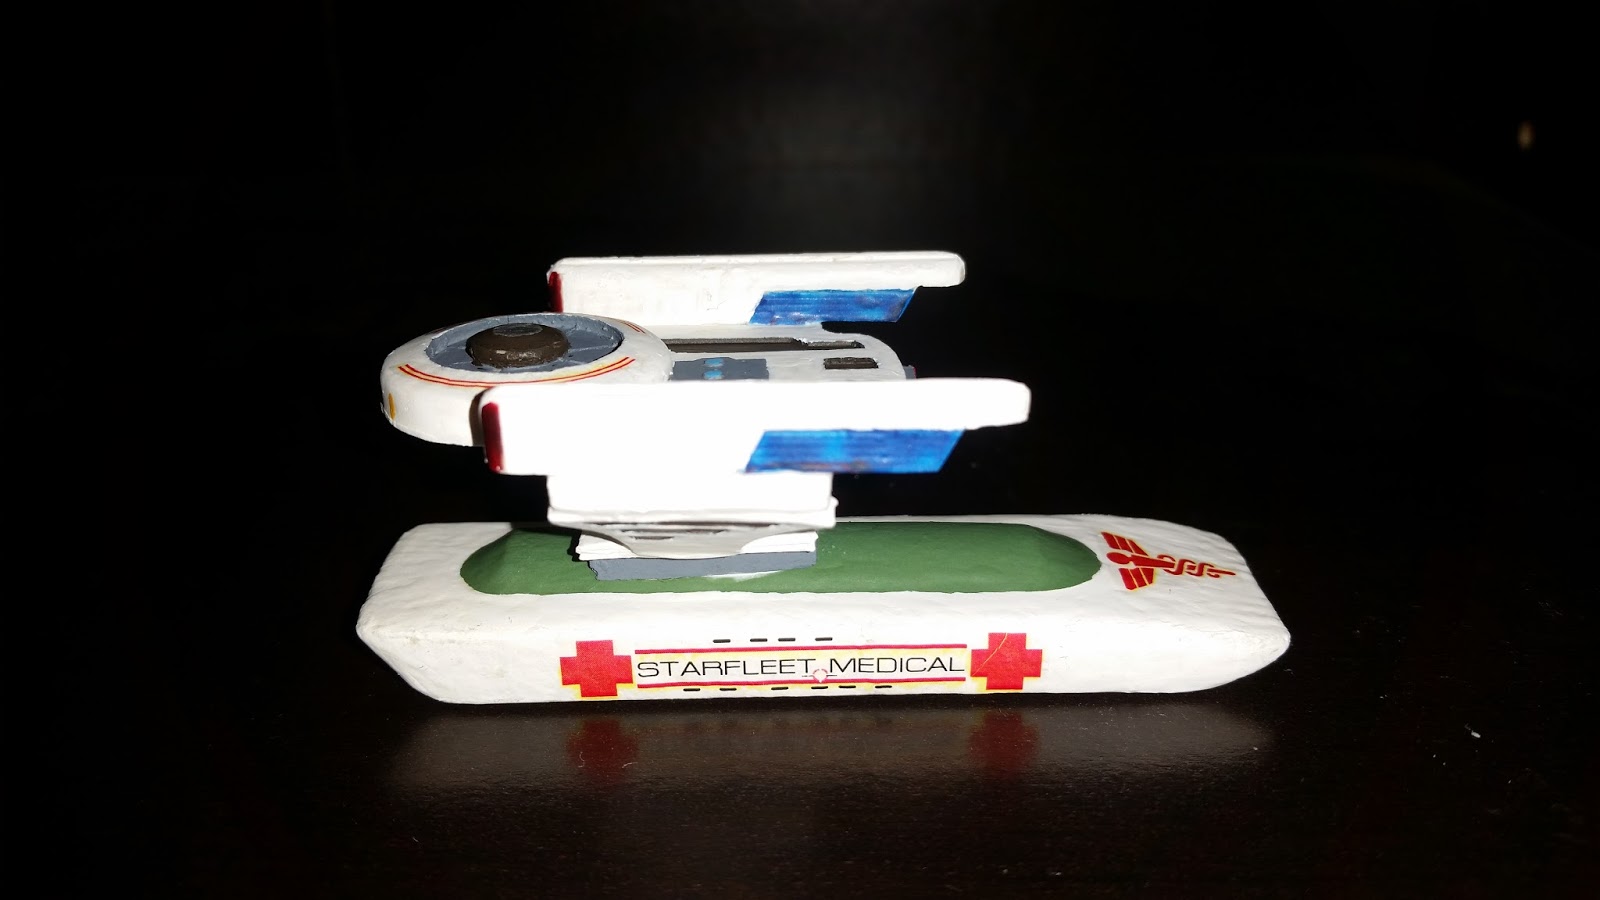
Hospital Ship Mode


Hauler Ship


DeepSpace Pat's Paint Scheme
NOTE: The tube container IS NOT part of the kit. I had some extra parts laying around and constructed this to allow me to display the ship with different types of cargo attached to it.
As you can see, I did not glue my hospital module to the cargo hauler. Instead, I placed the support rods in such a way as to allow me to balance the ship on top of the two different cargo types. Knowing that Jay has a bunch of cargo hauler variants, this configuration will expand my display possibilities for this ship.
Science Vessel


DeepSpace Pat's Paint Scheme
NOTE: The "rollbar" and weapons pod on my Science Vessel ARE NOT part of the kit. I added them to my ship because I always felt that these ships were severely weak in the weapons area which made them pretty helpless. I decided to beef mine up a little bit.
There was not a lot of excess resin on the kit. Cleaning her up and smoothing out blemishes was fairly simple.
Painting and assembly is where I ran into some issue on this kit. The challenge came to when I was trying to mount the support pylons and the science section and cargo mount for both ships. Although super glue can set rather fast, these pieces are rather awkwardly angled thus making it harder for the glue to bond.
My recommendation is to paint the parts first and then scrape away the paint where the parts will touch.
NOTE: If you are new to resin kit building, I recommend you read up on my helpful hints for gluing. You will find a link to that down below and it will explain my reasoning for the scraping.
As far as assembling goes, work with the bottom parts first before mounting the nacelles and bridge module. This will allow the ship to sit flat while you are mounting the bottom assemblies.
At this point, scotch tape became my friend. I taped the support pylons square to the hull like so...
Now, using the piece that will attach to these as a measurement tool, I slowly pushed the pylons inward until they touched the piece they are supporting. The tape had enough give to allow the piece to angle in, but still held them in place against the hull.
Note: Mounting the science pod will probably require you adding some extra temporary support on the tail end of the module while the glue sets.
Once the glue sets from the first setting, you can then remove the tape and glue the entire lower assembly to the hull of the ship.
For as much trouble as it was mounting the lower parts of the ships, I actually enjoyed myself while building them. Figuring out the solution to the challenge was very rewarding to me, and I'm glad to be able to share it with others who are planning to tackle this kit.
Attaching the nacelles was very easy and the only other "challenge" was deciding which bridge modules to use and then getting them centered before the super glue set.
Conclusion
Given the complexities I encountered with this kit, I can say with some authority that first time model builders and first time resin kit builders should not try this kit. However, that being said, this kit is pretty darned awesome. As I said earlier, I don't usually like these tiny ships, but what I ended up with, probably ranked up there with my favorite build projects.
BONUS ROUND!!!
Every once in a while, I'll have a little extra stuff to share with you that sort of fits in with my comparison articles.
While building this kit, I managed to acquire some extra parts and actually built a third Oberth like vessel. Together, the three ships make up what I call the Tres Hermanas (The Three Sisters) Fleet. Since that third ship is not part of this kit, I will talk about it in another post. You can find this ship and some historical back-story stuff I wrote up on it and her sister ships in THIS ARTICLE.
Also, some time after writing this article, I eventually acquired the Eaglemoss version of this ship. You can read my Eaglemoss vs. The World article by going to THIS LINK.
While showing off the Hospital Ship over at the Star Trek Modelers Group on FaceBook, someone took a big interest in her and offered to buy her. When I told him that she wasn't for sale, he offered to commission me to build him one. I managed to acquire him the medical ship kit and having already done one before, was able to pretty much get her done rather quickly.
USS Jeanette Isabelle (NCC-6199)
Oberth Class Medical Ship
1:2500 Cozmo Heavy Industries kit
Commission Build for Nathan Kaiser
1:2500 Cozmo Heavy Industries kit
Commission Build for Nathan Kaiser


As always, I hope you found this article useful and informative. If you have any questions, comments or suggestions, please feel free to comment below.
So for now, "Live long and prosper!!!"
Additional Links To Photos Of My Collection:
Helpful Hint Articles
NOTE: If you are new to my reviews, then please read on. This section talks about the garage kit maker that made this kit as well as a little about why I'm writing this review. If you are one of my regular readers, then feel free to skip the rest of this article as it is a word for word repeat of stuff from previous articles.
Kit Maker Information
Jay who runs Cozmo Heavy Industries sells all of his kits via eBay. He changes out what ships are for sale every Saturday evening so it is best to check in once a week to see what he has for sale.
Jay also maintains a FaceBook page where he likes to share his work in progress on future kit releases. I really like this approach as I'm a big fan of behind the scenes stuff.
Lastly, Jay does have a website, but it is more of an informational page about the business and he has hinted on FaceBook that he may be closing down that site.
I find Jay to be a very approachable garage kit maker. He has a regular day job and uses the business to not only allow him to make new ships for himself but to also help fund his love for the hobby. If you have ever followed Jay's work, you will know that he hand makes all of his kits from pre-existing parts, and he hand crafts all the other pieces for the ship. This allows him to produce all sorts of unique model kits. He loves to talk about the hobby and has lots of good advice about the hobby if you ever ask him for it. He will usually answer any questions you send to him within a day or two.
C.H.I.'s eBay Seller Profile: CLICK HERE
C.H.I.'s FaceBook Page: CLICK HERE
C.H.I.'s Website: CLICK HERE
Jay recently shared on his FaceBook page about his stance on stands. In it he wrote, "Everybody does theirs different. I use .055" piano wire and not everybody has that size drill bit. Plus, that tiny wire would put a hole in the bag and get lost. I have also seen people use clear rod, or use the base as a badge to apply to a larger stand." So there you go. And as I've said in other articles, I have yet to see a resin kit that comes with a rod.
DISCLAIMER SECTION
I consider myself an intermediate model maker. I'm pretty good with assembling kits these days and OK on the painting side of things. I ultimately end up with ships that look good enough to me to display in my collection. I've found that there are all sorts of neat ships out there that no one has made a pre-built or pre-painted model of, so, in an effort to expand my ship collection I've turned to building them myself, either by kitbashing or purchasing ready made resin model kits.
There are several smaller garage kit makers out there that produce some very good kits. I've actually developed a good relationship with a couple of them and volunteered some of my time to write up reviews about the kits I've purchased from them. I have already warned them that I intend to be pretty objective, not pull any punches, and these reviews are going to be written from the point of view of an intermediate model builder. If this means that I warn away a first time builder from a particular kit, then they will need to be OK with that approach.
Lastly, due to the nature of resin casting, not every kit is going to be the same. Excess resin and air pockets are a part of the game when you get into this sort of model building. The kit that I got and built may be slightly different than your kit as far as minor quality issues. I will still point out flaws with my kit as those flaws could lead into a lesson of some sort for either you the reader or the kit maker themselves.
No comments:
Post a Comment