
Rewrites: April 2016 & February 2019
When I wrote the review for the Bonaventure kit from The Delta Quadrant (check out that review at THIS LINK), I had hinted at the fact that I was intending to do a kitbash of that ship, and make it into a TMP era version of her. Normally, I would not venture into the realm of kitbashing a resin kit. They are after all, a bit more expensive than the 1:2500 Round 2 kits that I normally work with. If I shop right, I could get two of those Round 2 kits fore the price I paid for one resin kit and have a six ship to one ratio for parts. I really liked the Bonaventure ship though. It has a really sleek design and I could see Starfleet giving some of these old boats some new life by refitting them. And so, this kitbash was born.

And this is the story...
Building a refit was a bit of a challenge. Most of these challenges involved removing TOS era parts and making TMP era parts fit in such a way that they looked like a natural progression in the ship's redesign.
I am going to point out that I consider myself an intermediate model builder. I'm OK with the gluing and assembly and so-so with the painting. A lot of the close-ups you are about to see are going to highlight these facts, however, I felt it necessary to share these pictures in case someone else wanted to make an attempt at building this ship on their own.


The first challenge that I faced, was replacing the TOS style impulse engine with a TMP era engine. Removing the old engine was the easy part. I had a greeble of an impulse that was from another resin kit, but the bottom of the hull had a bit of a curve that did not allow the engine to sit flat. this required some cutting and shaving to make the room for it.


As always, I hope you found this article useful and informative. If you have any questions, comments or suggestions, please feel free to comment below.
So for now, "Live long and prosper!!!"
Additional Links To Photos Of My Collection:
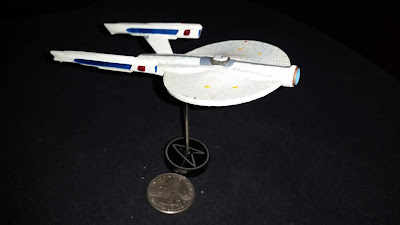
USS Bonaventure (NCC-1000)
Bonaventure Class Refit
1:2500 The Delta Quadrant and AMT Kit Kitbash


TOS Era Impulse Engine


TMP Era Impulse Engine
If you look at most TOS to TMP era conversions, the saucer section is usually slightly larger and thicker. This allows for more equipment and more personnel. This required a little bit of thinking as I could not just replace the saucer section as it was part of the main body of the ship. So I opted to fill in the indents on the top half of the saucer and fill in the concave part of the underside. Theoretically, that would provide more space in the saucer section. Filling the bottom was really difficult. I used Apoxie Sculpt to fill in the gaps. The issue was that, even though I washed the kit thoroughly, it was difficult to get the Apoxie to stay stuck to the model while I tried to smooth and level it off. In the end, I just kind of gobbed it on and let it set over night. The next day, I set about shaving, cutting, dremmeling and scraping it in an effort to "try" to level it out. The end result was not that great. Thankfully, nobody looks at the bottom of starships that much, so I can live with it.


TOS Era Saucer Section


TMP Era Saucer Section
The warp nacelles were the next obvious part that needed to be replaced. For this part, I used the nacelles and nacelle struts from a Round 2 Constitution Refit model. The only real adjustment was cutting the struts down to be the same length as the TOS version's struts. Mounting them was where the challenge really came in. The original kit has notches and tabs that helped to align the parts and they actually held the parts in place while your super glue set. The new parts did not have the necessary tabs to fit. In hindsight, I could have probably made the new struts a teeny bit longer and cut tabs into them. So in the end, I had to be VERY patient while the glue set. And if you have read any of my other reviews, then you will know that I'm not very patient, hence the need to attempt to re-glue the parts several times.


TOS Era Nacelle Assembly


TMP Era Nacelle Assembly
The deflector dish came as an after thought as I was working on the kit. Originally, I simply left off the actual dish, shaved down the dish area and painted it blue and copper.
As I continued working on the model, I realized that I wasn't liking this look. I had seen pictures on the Internet of what she would look like as a refit and the "nose" stuck out more from the saucer than what I was currently getting with this configuration. I then cut off the deflector dish from the now cannibalized Round 2 kit and mounted that. It didn't fit flush so I used model cement to start to build up the seam and try to level it out some. Once again, hindsight tells me that I should have just used the Apoxie putty.


TOS Era Deflector Dish


TMP Era Deflector Dish
Usually, when you are kitbashing a TOS era ship into a TMP era ship, you need to replace the bridge module. I did have some parts that I could have used, however for this model, I didn't feel like shaving the old module off and trying to make a slightly larger one work. And besides, I felt that this was one of those rare times when the bridge model looked fine as is, so I left it alone.

TOS Era Bridge Module

Unaltered Bridge Module for TMP Era
I initially was going to leave the sensor dome on the bottom of the ship alone.

Then while I was working on other areas of the ship, and looked more closely at this piece, I decided that this part of the ship should receive an upgrade too. And so I shaved off the old sensor dome and replaced it with a resin extra I had from a TMP era ship.
This in itself requires a bit of filling and expanding the area beneath the sensor assembly. It would have probably turned out nicer had I just beefed up that whole rounded area on the bottom of the saucer section.

TOS Era Sensor Dome

TMP Era Sensor Dome
And there you have it, a blow by blow break down of the Bonaventure Class Refit build.
Editor's Note: As of Novemeber 2015, Paramount served The Delta Quadrant a Cease & Desist order meaning that they could no longer sell any Star Trek kits. You can read more about this at All Scale Trek in THIS THREAD. This means that the base kit for this model build will gradually become even more harder to find (and more expensive) as there will no longer be any restocks of the kit.

As always, I hope you found this article useful and informative. If you have any questions, comments or suggestions, please feel free to comment below.
So for now, "Live long and prosper!!!"
Additional Links To Photos Of My Collection:
TOS Build ( The Model Work In Progress )
TMP Build ( The Model Work In Progress )
Comparative Pictures
TMP Build ( The Model Work In Progress )
Comparative Pictures
Helpful Hint Articles
No comments:
Post a Comment