
Rewrites: November 19, 2021
Waaaaaaaay back on October 27th, 2017, I published a small "How To" article to help my fellow Eaglemoss collectors with a little issue that had arisen with the addition of the Shuttlecraft Collection line of models. Things have changed since then. The Star Trek: The Official Starships Collection has finally run its course and "ended" with the production of issue # 180. HOWEVER, Eaglemoss is still continuing to produce some models under that line with additional Shuttlecraft Collections, additional Special Edition models, and a plethora of Extra (or Bonus) models. I think that in an effort to be more environmentally conscious, or maybe they are just getting cheaper on us, Eaglemoss has modified the sizes of the magazines that now come with the latter two lines of models. The problem though... is that the magazines from all three of the lines I mentioned are ALL DIFFERENT SIZES. None of those magazines fit inside the traditional binders from the collection either, and Eaglemoss doesn't sell anything to hold these odd sizes. What the hell Eaglemoss?
And so... I have decided to touch up that original article.
If you become a subscriber to the collection, one of the early subscriber gifts is a free binder for you to store your magazines in.


I liked the binders. They really come in handy for organizing those magazines. And so, I've continued to buy those binders to house all of my magazines. As stated above, a problem arises if you bought any of the Shuttlecradft Collections, or continued to buy Special Edition or Bonus (Extra) Edition models past the official end of the collection.


Photo Credit: Eaglemoss

I finally got tired of not having a place to put these smaller magazines, so, when I learned that Shuttlecraft Collection Set #3 was coming soon, and then I would now be dealing with 12 of these little magazine monsters, I did something about it.
After consulting with my co-workers at the time, who happened to be librarians, we came up with the following solution.
I started with a fresh binder, and drilled out the securing bolts that were holding the top bracket in place. It made sense to lower the top bracket so that the magazines would be on the bottom part of the binder. This would release stress on the binder bracket, the magazine, and allow everything to be stored nicely without making the binder top heavy.

You don't need to drill all the way through, just drill enough so that the top part of that bolt is ground away and falls off. You can then use a screwdriver to push the bolt the rest of the way through the bracket, and ultimately, the binder itself. I was then able lift off the top bracket.


After careful experimentation, it seems that Super Glue, when applied with some care, is the best option for reattaching the bracket. A light sanding of the back of the bracket, as well as the area where you will be attaching the bracket to, will help give the glue a better surface to bond to.


And best of all... my odd sized magazines are not falling out and onto the floor every-time I pull out thier binder.

As always, I hope you found this article useful and informative. If you have any questions, comments or suggestions, please feel free to comment below.
So for now, "Live long and prosper!!!"
I am a fan of most of Eaglemoss' Star Trek Starship collection. Although I don't usually talk about them, I love the magazines that come with each of thier models. They are informative and provide all sorts of insight about the in-universe and the real-world backgrounds of the ships.
If you become a subscriber to the collection, one of the early subscriber gifts is a free binder for you to store your magazines in.
Photo Credit: Eaglemoss

Photo Credit: Eaglemoss
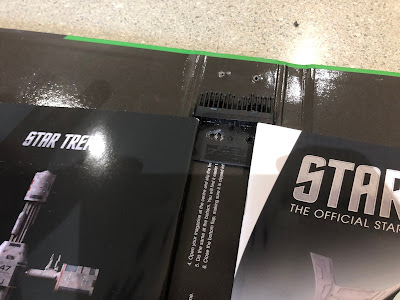
As you can see here, there is a sizable difference in magazine sizes, and it was initially frustrating for me.

After consulting with my co-workers at the time, who happened to be librarians, we came up with the following solution.
I started with a fresh binder, and drilled out the securing bolts that were holding the top bracket in place. It made sense to lower the top bracket so that the magazines would be on the bottom part of the binder. This would release stress on the binder bracket, the magazine, and allow everything to be stored nicely without making the binder top heavy.
I then did some measuring with one of the magazines and marked where the bracket would sit.
Over the last four years of having to modify my binders, I learned a few things about this next step.
IMPORTANT NOTE #1: Learn from my mistake and DO NOT use Gorilla Glue. The stuff foams up and leaves a bit of a mess.

IMPORTANT NOTE #2: I'm not sure if a hot glue gun would be a better option. I'm pretty sure that it won't bond well enough and the magazine weight will eventually pull the bracket off.
IMPORTANT NOTE #3: DO NOT have the pegs installed when you glue the bracket down and leave the secure flap on that bracket in the closed position, otherwise, you might accidentally glue everything in the open position.
A liberal amount of glue is fine, but be warned that super glue, when applied in larger amounts does take a bit longer to dry and might get a bit runny. Clear away excess glue with a quick swipe of a paper towel and avoid touching any wet stuff with your finger(s) or else you could become a part of your binder.
The application of a liberal amount of glue, while taking longer to set and dry, does afford you time to check your measurements one last time and make any minor adjustments before everything sets in place.
And in the end, you end up with a binder that matches the others in your collection...

...but fits those smaller magazines, AND allows you to store them safely.


As always, I hope you found this article useful and informative. If you have any questions, comments or suggestions, please feel free to comment below.
So for now, "Live long and prosper!!!"
No comments:
Post a Comment