Rewrites: February 2019
Whenever I build a TOS era (or in this case, a pre-TOS era ship, I often try to build one in TMP era style. This model is one such build.
Rather than go on an on, and repeat a bunch of stuff I have already said about the USS Ares,, I'll instead, point you to the article about my original Ares build, which also talks about second build I did of her. You can find that article at THIS LINK.
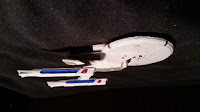
Ever since I built by USS Ares in 1:2500 scale, I've often wondered what a TMP era refit version of the ship might look like. I eventually stumbled across a picture that someone had done up of her, and finally gave in and attempted to build my own. As I did with my second Ares build, I made up a template and used that to help cut out the correct sized parts. My model is not an exact replica of the original artwork. I am not an expert scratch builder, so I had to make do with what parts I had on hand. I also noticed that my nacelles are not as long as the ones in original picture, however, in the end, I think my model turned out pretty good. I may even attempt at making another one... Just kidding... No I won't. 😀
USS Ares (NCC-1650)
Ares Class Refit
1:2500 Scale AMT Kitbash
And the first step was to make a template to allow me to easily size up the different parts of the ship. Thanks to modern technology, making templates for my 1:2500 scale parts was a breeze. I opened up Microsoft Word and then zoomed the edit screen to be the same size as the paper I would be printing on. I then inserted the picture and re-sized the picture so that the saucer section was as large as my physical piece. Save and print and I now have a template.
If you would like a copy of the template I made, simply click on THIS LINK.
And on to the build! I cut out the bottom of the saucer section and then "filled" it in with sheet styrene. I also cut out a majority of the bottom of the saucer section, and then remounted it to my sheet styrene. I was hoping to save the sensor dome and phaser banks.
Looking at my work the next day, I think that the sensor dome is now sticking out too far from the bottom of the saucer and will hinder the deflector dish. I had to carefully remove that with my exacto knife. I then cut out the sensor dome and glued that on to my modified saucer section.
After a nice long 3 day holiday weekend break, I made a bit of progress with the saucer section. After cutting out the template for the engine section, I used it to cut several pieces of sheet styrene. Unfortunately, I don't have the skill set to make the correct details on the top of the engineering section, so I used some various greebles from my parts box.
I then had a somewhat productive weekend with this major little project. Using some sheet styrene, I widened the engineering hull to the width of my template. And then it was putty, putty, sand, more putty, etc. Eventually, I was able to cut down the secondary hull enough to mount her on the saucer. I glued on the deflector dish, and then using more sheet styrene and putty, extended the secondary hull forward onto the saucer section. I need to let the putty set and then do some sanding and shaping.
This was a fun little project that re-challenged my building skills. I hope you enjoyed following along with my build of her.
As always, I hope you found this article useful and informative. If you have any questions, comments or suggestions, please feel free to comment below.
So for now, "Live long and prosper!!!"
Additional Links To Photos Of My Collection:
AMT Kitbash ( The Model Work In Progress )


It does look better with the TMP engines just like the Enterprise did IMO. Congrats on adding some unique (and likely impossible to get in the future!) models to the collection.
ReplyDeleteThanks! This was one that I had in my build queue for a while and finally built up the courage to make her.
Delete